So I have found it very hard to find out how to open up an HP notebook, so I created this page to help others. (Created 12/28/02. Last updated 10/1/05.)
It might be a good idea to read all these comments through before you begin, especially if your heat sink isn't doing its job. And do not turn on the computer without a properly attached heatsink!
USE THE INFORMATION AND DIRECTIONS ON THIS PAGE AT YOUR OWN RISK. I DO NOT WARRANT THIS INFORMATION AND WILL NOT BE LIABLE FOR THE OUTCOMES OF USING THIS INFORMATION. This page may contain inaccuracies! Links or references to other web sites are not endorsements. Also, if you aren't an HP Authorized Service Provider, you might not be allowed to do this stuff, and it might invalidate your warranty. Also, the hardware designs depicted are probably patented by HP, so dont go making things based on these pictures!
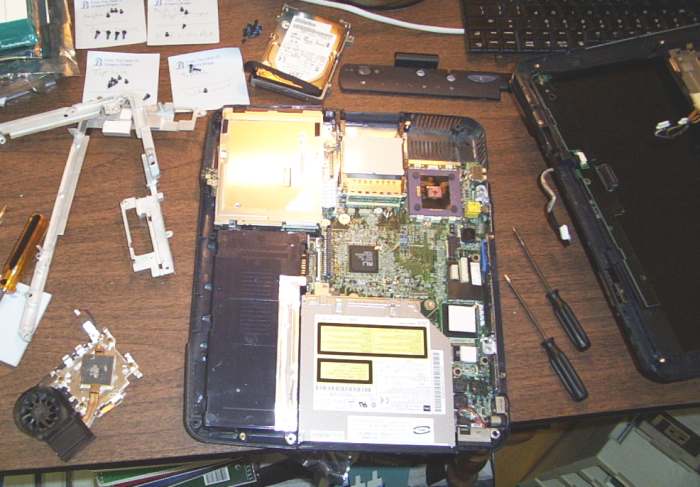
You will basically work into the inside through the keyboard side. I did this on a N5430 but it should be the same for the XE3. NOTE that the order of the procedure might be different for an XE3, so use common sense to figure it out. This is a historical account of what I did. Also, most parts are attached by cables that it is important for you to not pull on. There will always be another method to release the cable that does not involving pulling on the cable. Notice how all the cables fit together nice and flat, you need to put them back this way later.
1. Remove all the screws (something like 12) you can visibly access, these will be on the bottom and rear panel. Make sure you keep track of what screws came from where, you will have about 40 screws once youve gone through all the steps. (A note about the N3xxx series: "there turned out to be *one* screw underneath one of the rubber feet!" --Jeff) (and about a ze41xx: "a row of 5 screws underneath the laptop on the front edge that are hidden under rubber plugs" --Rob)
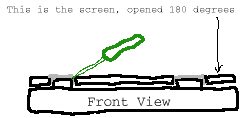
2. Set the laptop rightside-up. Remove the 2 screws from the back of the two screen hinges if you didn't already. Then open the screen 180 degrees and support it with something so that when we detach it, it will stay put.
3. Plastic above keyboard. Insert a small flat-bladed screwdriver underneath the top of the screen hinge cover plastic, and pry the plastic up a bit from both hinges (see the drawn picture below). You will be removing the plastic piece that has the power switch and status lights and such, above the keyboard. Now that you have gotten it to come up a little bit, you just need to keep pulling on those hinges (and not on the front side, even though it is very tempting to do so. It took me forever to get this piece off but it turns out it has some lips along the front side so you need to angle it out from the back. I thought it would break off but it finally came off OK).
(Click on photo to enlarge)
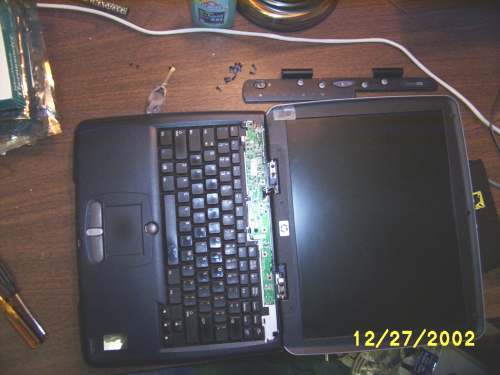
4. Keyboard. Four screws hold the keyboard, unscrew those, remove and unplug the keyboard.
4.5. DVD drive I didn't need to remove this at all, but "Doug" wrote to me saying that if you are replacing your DVD drive, you just need to remove the screw from the one corner of the hard drive where it is attached, and then you can go ahead and do the replacement without disassembling anything else. BTW, he has a N5290.
5. Circuitry for that status cover. Two screws hold the circuitry for that status cover from #3, remove them and then lift from the left side. You can leave it connected to the display if you want.
6. Display. Disconnect the display cable from the video circuit. Don't mess up those DIP switches, they are set for the model of your LCD. Now unscrew the 4 screws that support the display, and set the display to the side. I dont think that the display comes apart any further.
7. Top casing. Unscrew the 6 screws holding the top casing on. Two are toward where the bottom of the keyboard, the other 4 are at the top. There is a plastic clip near the network and phone jacks that you may need to unlatch. There is a cable running to the CD player panel, underneath and attached to this case. To disconnect, lift the upper plastic on the connector on the mainboard, and then the ribbon cable will be released. To reconnect, lift the plastic again, insert the cable, then lock the plastic down again.
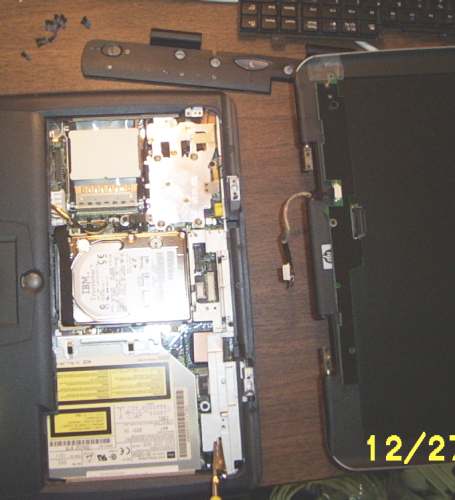
8. Hard drive. Unscrew the 4 hard drive mounting screws (they are attached to the mount and wont come out all the way), and then use the fabric handle to remove the drive.

9. The metal bracket around the outside. There is one screw along the left and one along the right to remove. The center one is optional for you to remove, because I don't think you need to. (It will separate the bracket into two pieces if you remove the center one.) Note that the bracket has a latch that you need to unlatch next to the network jack. (I think you will need to get to this step in order to fully access the top of the AC adapter plug.)
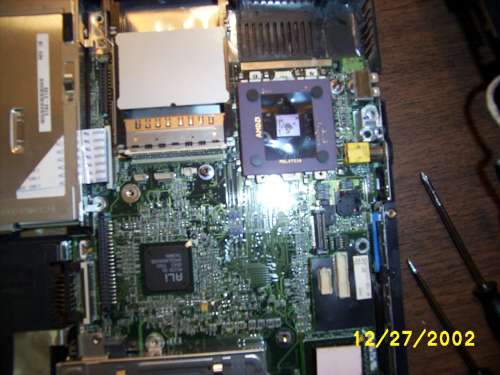
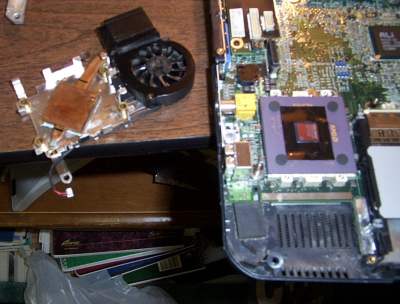
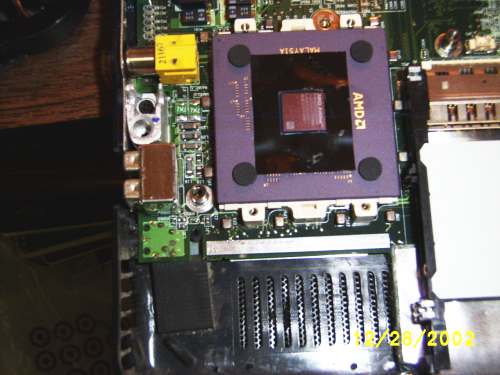
10. The heatsink. (By the way, NEVER turn on the computer without the heatsink properly attached!!) Note that if you remove this you will need a new thermal pad or new thermal compound (old wont work). You can find out how to apply these sorts of things from other sites on the internet. It is very important to get this right because your chip will fry itself otherwise. So anyhow, there are 4 main screws. They will have attached springs (Something to do with sustaining an even pressure between processor and heatsink.) These 4 are numbered, remove and reinstall in that order. There might be other obvious things needing unscrewing, I had to remove two other screws that seemed to be for aligning the heatsink prior to reattachment.
Note (from Gene James): When reinstalling the heat sink, the key requirement is successively tightening the 4 screws by degrees. So one should turn each a turn in the order of the numbers until they "resist" and then tighten them alternately by slight increases in torque until they are a tight "thumb tight." This allows the heat sink to settle evenly on the chip. If one tightens one screw first, a large load will be applied to edge of the chip and possibly crack it. I note that the fan is thermostatically controlled to conserve power. One shouldn't panic if it stops and restarts frequently.
(Click to enlarge images)
Thats it! (Unless you want to figure out how to remove some more parts...) The laptop I was working on had a problem overheating; when I removed the heatsink I found gobs of dust inside the fan assembly. Using tons of canned air I was able to clean it. I am now looking for some sort of external air filter to prevent recurrence (see the FAQ below).
If you visit http://www.data-plumber.com you might find some additional info on your laptop (like service manuals perhaps! There are pdf manuals on the Internet... another site you can try is martini-man.com).
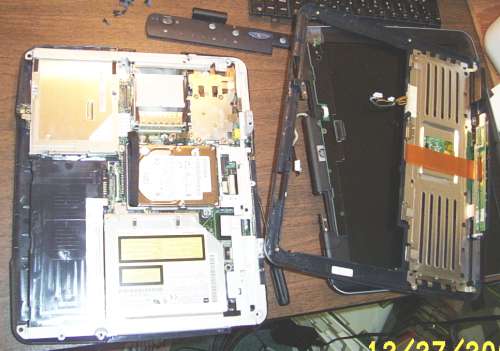
To disassemble the display:
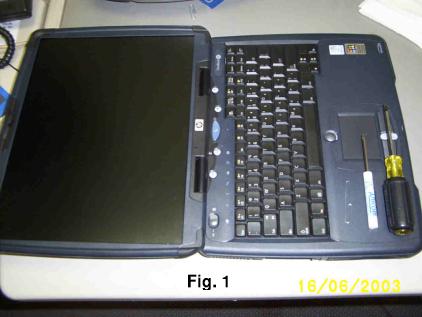
Start with the notebook open 180 degrees as in Figure 1, but with the status panel removed (it isn't [removed yet] in the picture).
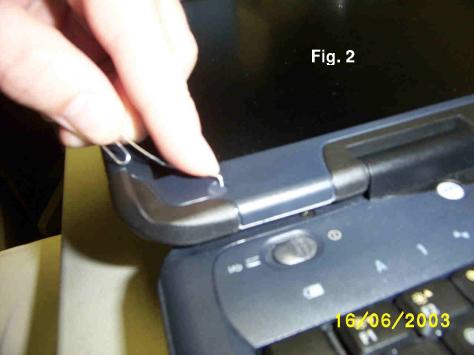
1. Remove the rubber plugs that cover the display screws (Figure 2). Near each corner of the display there is a rubber plug that covers a screw. To remove those plugs, I used a small screwdriver and a paper clip with the end bent at ninety degrees to make a hook. Push down on the plug with the screwdriver, which opens up a gap on the side of the plug, and use the hook to pop the plug out.
2. Remove the four silver screws that hold the display in place.
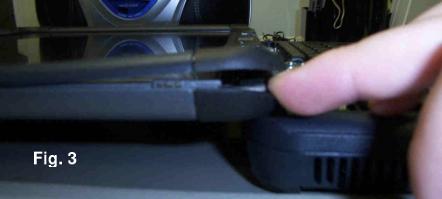
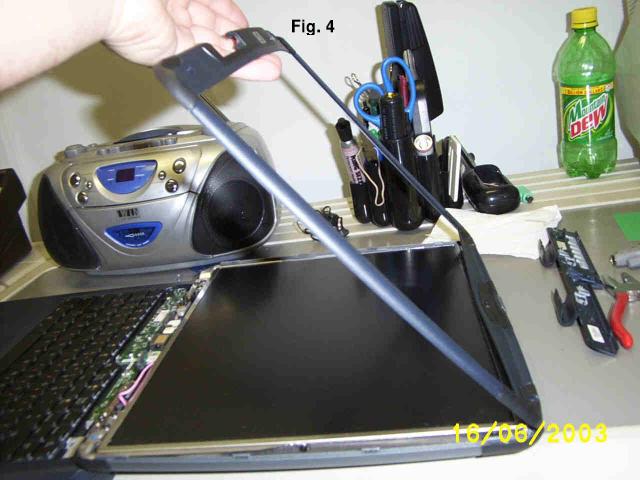
3. Open the sides of the plastic shell that holds the display (Figures 3 and 4).
4. Lift up the plastic on the lower left hand corner and begin to work your way around the edges. You may want to slowly slide a small screwdriver along the crevice to help locate the plastic clips that hold the two halves of the plastic shell together. When you find one of these, just twist the screwdriver or put some inward pressure on the clip while lifting the plastic.
NOTE: When you reach the sliding release lever at the top of the display, you'll see that it also helps to hold the shell together. Ignore this for now and repeat step 3 starting from the lower right hand corner.
5. Open the bottom side of the shell. At this point the sides of the shell are open, but the top and bottom are still held together. To open the bottom place your fingers on the plastic edge above the logo and pull toward you. The plastic will pop open, and now the only thing holding the shell together is the slider at the top.
If you're just looking to check/change the display cable, you can stop right here. Disassembly beyond this point is possible, as you will see below, but if you go past step 6 reassembly is a PITA.
6. Free the top of the plastic shell from the latching system (Figure 4). Lift the cover from the bottom so that it hinges on the top edge. Pull the slider back so that the latching hook doesn't hold the cover on. Be gentle and don't bend the slider or stress the plastic too much, but a fair amount of lifting force is needed before the top piece snaps off.
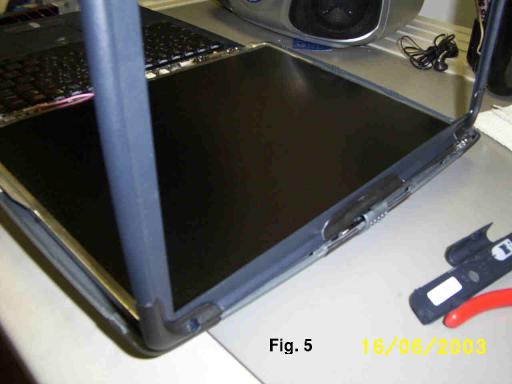
Reassembly Tip: When putting the top half of the plastic back on later, start with the top standing straight up and inserted below the plastic slider (Figure 5). Pull the slider half-way back so the hook will go into the slot, and begin to lower the top into place. This may take some fancy fingerwork. Eventually you'll get this assembly to snap back together, just make sure all the parts are lined up and try not to put too much stress on the hook.
----------
I didn't take it apart any further than that, but you could. Just disconnect the wiring and remove the screws that hold the LCD in at the bottom. To disconnect the wiring, you'd need to have the status panel circuitry and possibly the keyboard or top of the unit off, and I didn't have the time or the need to go that far. I just wanted to check the wiring to see if it was worn out because the display is flickering. In my case, the display flickers because opening and closing the lid causes the LCD to twist, which obviously isn't good for it. HP probably should have used more metal in the top half of the shell to keep it from twisting like that and wrecking the display.
The silver set of display data wires or bus (as opposed to the black wires feeding the step-up transformer for the illumination) is very fragile. Display anomalies (displaying black screen as green with fringes) could be made to disappear by squeezing one part of the bus between my fingertips. Repeatedly doing this also made the fatigue related disorder worse. The only fix is to replace the display bus. (This paragraph contributed by bam at discussit dot short for organization.)
[Reminder: NEVER turn on the computer without a properly attached heatsink! See the section on heatsinks above.]
My fan had been making noises, I learned [it was] from hitting the wad of dust covering the inside end of the heatsink fins
I have two suggestions.
1). there were two phillips screws located on the housing's edge on the impeller side of the fan. By removing these and the plate It was easy to manually remove the wad of dust that had accumulated on the inside of the heatsink requiring less air and allowing me to clean up the inside housing behind the impeller.
2). I removed the whole fan housing by removing the three screws on the plate side. I then peeled the decal covering the shaft with an exacto knife and coated the end of the shaft with a bit of lithium grease. Then using the spray tube from my can of WD40 like a pipette (not sprayed) to added a drop or two of WD40 to the shafts well and stirred it into the lithium grease, being careful not to get any on the housing where the decal goes (the decal won't re-stick if housing oily). I then replaced the decal and reassembled the fan. I have done this with many cooling fans and found the life span of a cooling fan can be extended considerably
Now that I have taken it apart ( and successfully reassembled it ) I believe intrusian into this problem may be able to be solved with some thin wire and tweezers.
Some comments regarding the above, from Gene James: "Having found a great wad of debris jammed between the fan and the heat exchanger, and knowing now that this is common, my first suggestion is to blast air into the exit grill. Not a wimpy canned air thing, but 50 PSI from a compressor. This will break up the debris and blow it out through the intake. Do it in a few short blasts so as not to rev the fan to 20,000 RPM and explode it. This, I might add, is an excellent annual procedure for any PC.
I'd advise against using WD40 or 3-in-1 oil on the fan bearing. These permanently lubricated bronze sleeve bearings do not take well to most light oils and will seize up soon after it's use. There are some specialty oils that are better for this (I use "turbine oil" from Sears washing machine parts dept) but the ONLY permanent solution to a seized or worn out sleeve bearing is replacement."
There is so much to this topic, I moved this section to a seperate web page on troubleshooting laptop power issues.
My laptop just powers off after being on for a few minutes. Is this the same problem as you had?
I experienced crashes and lock-ups, but powering off is also a symptom of heat problems I think.
Did you replace the heatsink?
No, I just cleaned it, using canned air. (And put on new thermal paste.)
Did you come up with an external air filter?
Actually, yes, but its not elegant. I bought an air filter and taped it onto a PC case fan, and directed the air from that into the side air intake. This is the sort of thing that you could leave on the desk where you normally use the laptop, but you wouldn't want to bring it with you. A better solution might be to buy a fine screen and attach it to the outside where you could clean it, like a clothing dryer lint filter or something might work well, but you need to be sure that the filter isn't constricting the air flow.
David Bishop writes: Buy a pair of women's nylon stockings(I prefer to use black stockings since it shows the dirt better and usually matches the notebook case better), cut a single layer to size and tape it over the air intakes (don't stretch the stockings). I've used electrical tape (better color match, thinner, but tends to fall off rather quickly) or duct tape (lasts longer, but looks bad and is thicker, which can make a unit rock if you have to cover one of the feet). When the 'filter' shows a lot of dust, remove it and repeat. The stockings don't significantly restrict airflow, it is totally portable, and if you match the colors well, virtually invisible.
"I was able to extend the work time indefinetely by placing a glass of ice near the fan intake..." (writes Richard Dobe)
Neat way to prove that it is a heat issue.
Couldn't I just take the bottom off to replace [component], instead of taking off the display and all?
No, assuming I am remembering this correctly. The mainboard is screwed on to the bottom from the inside. That is, you would have to take off the top before you would be able to take off the bottom.
Is my processor broken/fried?
Probably not, unless you tried to use it while the heatsink was detached.
My computer doesn't even boot, after I tried to fix it...
Most likely, you left a loose connector somewhere. Go back and make sure you put everything back together. This worked for at least one person :-).
My computer still crashes sometimes after I tried to fix it...
If you have Windows ME, then you should probably get a different operating system, because ME seems to crash more, in my experience. Windows 2000, Windows XP, or Linux should give better results. (Note, I think the Windows ME problem might be due to Windows ME not using the appropriate cooling commands for the AMD Athlon, causing it to run much hotter, and thus less stability. Either way, Windows ME in general has been known to crash often.)
Is overheating caused by a design flaw? Are replacement parts available?
Appearantly, HP's internal web site acknowledges that it is now a known issue that this processor heatsink is prone to get clogged with dust and fail. Their repair procedure involves putting a mesh over the air intake to prevent dust from getting in, as well as putting in a new heatsink. (Intake Filter Mesh AMD: F2112-60949 & Heatsink Assembly: F2111-60949, maybe buy online at http://partsurfer.hp.com/)
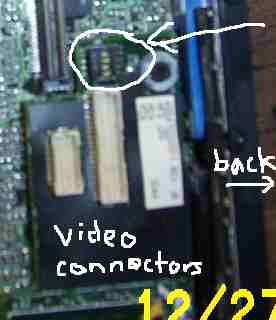
Where are the DIP switches for the display type setting?
I would NOT recommend changing this setting unless you bought a new display. I suppose you could damage something if this is wrong, but I dont really know...
The power connector?
Heres the best pic I have:

Other power issues?
Look at my web page on power troubleshooting
Completely remove power?
To do this, unplug the AC adapter and remove the battery. Then, hold the power button for about 15 seconds to drain any remaining voltage. (Thanks, Metin)
How to remove CPU chip from mainboard?
This socket, like all modern CPU sockets, is a ZIF (zero insertion/removal force) socket. You basically need to unlatch the chip, and then will come fully loose from the socket. You can see two screwdriver slots on either side of the cpu, I think one is labeled "OPEN" and one is labelled "LOCK". You just need to push that piece of plastic in the dirction of the arrows (away from the chip, i think), to change the socket from latched to unlatched. BTW, do not turn on the computer with an unlatched chip.
How to disassemble the XF255 model laptop? (Contributed by Michael C.)
It seems the xf255 has the same extact internal design, because expect for screw locations/numbers, it was identical. As a good way for getting the brazel off - pry of the F1-12 keys, and then pull up on the right hand side.Once thats out, slide your finger in the edge and run it across. The whole thing will quite litterary pop out, and it's easy to replace.
I had two USB cables plugged in when the laptop slid into a wall, destroying the female USB ports. How difficult to solder in a replacement?
It is likely to be possible. The hard part will be removing the old connector.
The first trick will be to get high temperature, grounded soldering iron(s). In my very limited experience trying to remove components from manufactured circuit boards, the solder is fairly hard to melt.
Another problem I anticipate is the number of pins that you will need to simultaneously unsolder. It might take help from another person and another soldering iron. And try not to melt nearby components :-). Maybe a third person to pull on the component with some pliers, since it will be hot.
I would recommend practicing on some dead hardware first, if you can find a non-functional computer part to mutilate. You should also read up on proper soldering technique for pcb's.
Please let me know if you succeed, it would be worth publishing the result.
I turned the computer on without a heatsink attached, or attached but I didn't use thermal grease/compound. Is my chip fried?
Noo! Don't do that! Anyhow, if your chip is a newer Intel model, it has a good chance of survival. On the other hand, many AMD chips fry in like 3 seconds or something. You might as well double check your cables and give it another try before throwing it in the trash. In many (most?) cases you'll have visible damage. At least replacements are only like $60 for the AMD, if you don't need a Mobile one. You might try pricewatch.com for good prices on replacement chips, but check the reviews of the sellers first.
I was able to view some information authored by Hewlett Packard prior to writing these directions, which provided some hints.
Various emails helped me to improve this page as well. Thanks to those people, including: Ken Winstrand (excellent write up), Richard Dobe, Doug, Brian A., Sachin S., Gene James, John, Metin, Rob, David Bishop, and Chris Wilkinson.
Linux is a Registered Trademark of Linus Torvalds.
Windows ME, Windows 2000, and Windows XP are trademarks of Microsoft.
Site Hits: